Yoga Stretching
STRETCH!
There is a term in physiology called “creep.” It refers to the constant shrinkage of tendons and ligaments. So STRETCH! It’s the only way to beat the creep! If you spend a lot of time in front of your monitor, then you really need to get up and stretch for at least five minutes each hour.
Assess the gravity of your situation. Your body is essentially designed to constantly be moving around in the canopy. It does not recognize the ground (or shoes) as the proper place for your feet. And it certainly does not recognize chairs as proper places for your derrière. Integral to the functional design (and health) of your body is to have a constantly changing orientation to gravity.
Asanas (yoga postures) are designed to provide your body with this necessary changing orientation to gravity. In order to perfect the postures extreme stretching is employed. Regular practice at approximating the asanas and using breath and gravity to allow you to relax further into the pose is (hatha) yoga.
Daily Stretches
Some days, it’s just not possible to put in a full hour and a half of yoga. But most days will allow for this 10- to 15-minute sequence that stretches the back, hamstrings, and hips, problem areas for many people. Over time, you will see the positive effect these stretches have on your longer practice sessions.
Pelvic Tilts
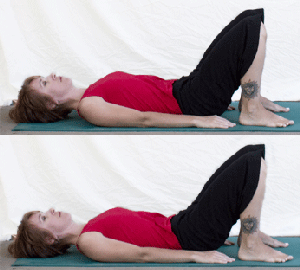
The first few pelvic tilts reveal any traces of low back pain, but after 10 to 20 pelvic tilts, the pain is gone. Do them slowly, and keep going until any pain is gone and the movement feels fluid and good.
1. Lie on your back with the knees bent and the soles of the feet on the floor. This is your neutral position, with the natural curve of the lumbar spine causing the low back to be slightly elevated from the floor.
2. On an exhale, gently rock your hips towards your face. Your butt will not actually leave the floor, but you will feel your low back press into the floor. You are essentially taking the curve out of the low back. Think of the pelvis as a bowl of water. When you do the pelvic tilt, the water would be spilling towards your belly.
3. After a few seconds, inhale and return to your neutral position.
4. Repeat this movement 5 to 10 times.
The animation above illustrates the subtlety of the movement. (animation and images below ©Barry Stone)
Cat – Cow Stretches
Continue warming up the back with 5 to 10 Cat – Cow Stretches. The movement of the pelvis in a Cat – Cow is similar to a pelvic tilt, but the Cat – Cow stretches that movement along the entire spine.
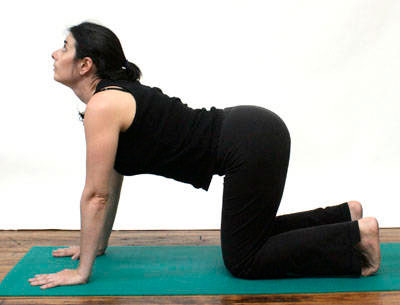
1. Start on all fours, bringing the wrists underneath the shoulders and the knees underneath the hips.
2. Think of the spine as a straight line connecting the shoulders to the hips. Try visualizing the line extending forward through the crown of the head and backwards through the tail bone.
3. Keep the neck the natural extension of the spine.
4. Curl the toes under.
5. Drop the belly.
6. Take the gaze up toward the ceiling.
4. Let the movement in the spine start from the tailbone, so that that neck is the last part to move.
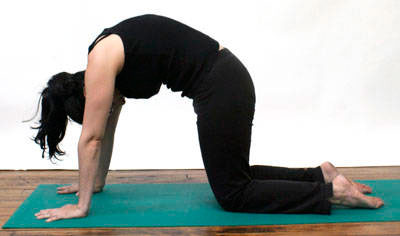
On the next exhale:
1. Release the tops of the feet to the floor.
2. Round the spine.
3. Drop the head.
4. Take the gaze to the navel.
5. Repeat the Cat – Cow Stretch on each inhale and exhale, matching the movement to your own breath.
6. Continue for 5-10 breaths, moving the whole spine. After your final exhale, come back to a neutral spine.
Downward Facing Dog
Press back into Downward Facing Dog. Pedal the legs, bending one knee and then the other, reaching each heel towards the floor. Settle into the pose and hold 5 to 10 breaths. Downward facing dog is done many times during most yoga classes. It is a transitional pose, a resting pose and a great strengthener in its own right. It may be the first yoga pose you encounter as you begin a yoga practice. Downward dog is so prevalent, even people who have never done yoga have probably heard of it.
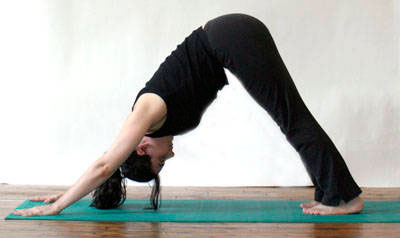
1. Come to your hands and knees with the wrists underneath the shoulders and the knees underneath the hips.
2. Curl the toes under and push back raising the hips and straightening the legs.
3. Spread the fingers and ground down from the forearms into the fingertips.
4. Outwardly rotate the upper arms broadening the collarbones.
5. Let the head hang, move the shoulder blades away from the ears towards the hips.
6. Engage the quadriceps strongly to take the weight off the arms, making this a resting pose.
7. Rotate the thighs inward, keep the tail high and sink your heels towards the floor.
8. Check that the distance between your hands and feet is correct by coming forward to a plank position. The distance between the hands and feet should be the same in these two poses. Do not step the feet toward the hands in Down Dog in order the get the heels to the floor. This will happen eventually as the muscles lengthen.
Lunge
Step the right foot forward next to the right hand, coming into a low lunge. Drop the back knee down to the floor for a nice stretch in both hips.
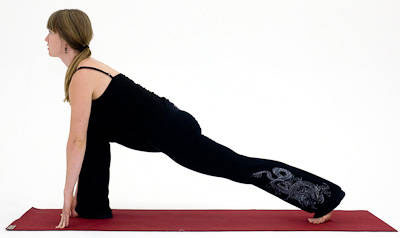
Re-straighten the back leg if you have dropped that knee to the floor. Slowly straighten the front leg as you forward bend over that leg. Try to keep the front foot flat on the floor and don’t force the leg to come straight. Go back and forth between a bent and straight front leg several times. Step back to Downward Dog, and then step the left foot forward next to the left hand and take the lunge on this side. Come back to Downward Dog.
Plank Pose
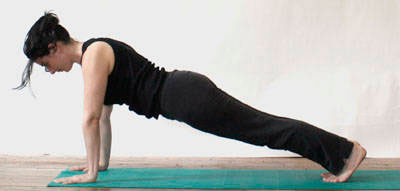
1. From Downward Facing Dog, draw the torso forward until the shoulders are over the wrists and the whole body is in one straight line. This is very similar to the position you would take if you were about to do a push up.
2. Press the forearms and hands firmly down, do not let your chest sink, press back through the heels.
3. Keep the neck in line with the spine and broaden the shoulder blades.
Beginners: Move back and forth between Down Dog and Plank making sure the distance between your hands and feet does not change.
Advanced: Try lifting one leg at a time.
Tadasana
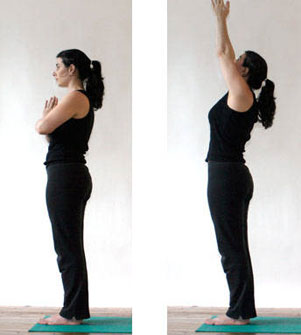
1. Come to stand with the big toes touching.
2. Lift up all your toes and let them fan out, then drop them down creating a wide solid base. You can separate your heels slightly if your ankles are knocking together uncomfortably.
3. Bring your weight evenly onto all four corners of both feet.
4. Let the feet and the calves root down into the floor.
5. Engage the quadriceps and draw them upward, causing your knee caps to rise.
6. Rotate both thighs inward, creating a widening of the sit bones, and tuck your tailbone in between the sit bones.
7. Tone the belly, drawing it in slightly.
8. Widen the collar bones and make sure the shoulders are parallel to the pelvis.
9. The neck is long, the crown of the head rises toward the ceiling, and the shoulder blades slide down the back.
It may seem like you are just standing there, but bringing the body into alignment is hard work. The alignment for Tadasana carries in to many of the standing and inverted poses.
Cobra
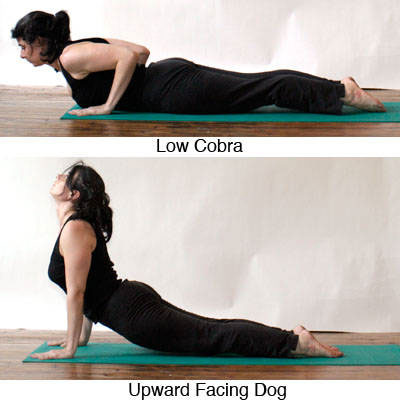
Cobra is usually done as part of the Sun Salutation vinyasa sequence. It is can be done as an alternative to Upward Facing Dog in the sequence for beginners.
1. From Knees, Chest, and Chin position, release the tops of the feet to the floor and press them down.
2. Slide your chest forward and up keeping your hands exactly where the were.
3. Roll your shoulders back and lift the chest higher, while keeping the low ribs on the floor.
4. Keep your neck neutral, don’t crank it back.
Beginners: Strongly engaging the legs and pressing them down will help you bring your chest higher.
Advanced: Keeping the chest high, bring the palms off of the floor. Or keep the palms on the floor and start to straighten the arms for a more intense backbend.
Knees, Chest, and Chin – Ashtanga Namaskara
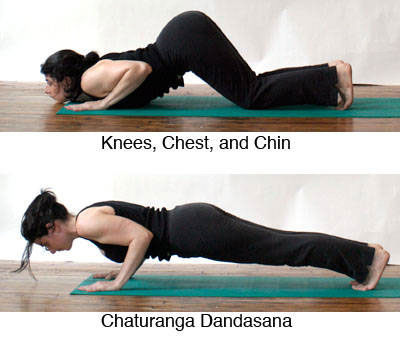
1. From Plank position, drop the knees to the floor.
2. Bring the chest and chin forward and down to the floor, placing the chest right between the hands.
3. Keep the elbows hugging into your sides.
4. The hips should stay high.
Beginners: This pose is like a half push-up, and will help you build the arm strength necessary to move onto Chaturanga Dandasana
Advanced: You may want to include Knees, Chest, and Chin in your first few Sun Salutations as you warm up before going on to Chaturanga.
If you are a beginner:
Exhale – Drop to your Knees, Chest, and Chin
If you are more advanced:
Exhale – Lower down to Chaturanga Dandasana
Sun Salutations
Sun Salutations (Surya Namaskara in Sanskrit) are the core of a Vinyasa style yoga practice. A sun salutation is a series of poses done in succession so that one pose flows into the next. The pace of the flow and how long the poses are held may vary, but the movement is done in accompaniment with the breath. The purpose of the Sun Salutation is to warm up the body for more intense stretches.
Yoga With Les Class 17 – Sun Salutations from Les Leventhal on Vimeo.
How to Get Your Body to Work More Efficiently Through the Practice of Yoga
Most of our lives are spent damaging our outer body. We put makeup or creams on our skin, we puff out our chests, we stick out our bellies, we over extend our hip flexor muscles. Age is also a cause to why our body deteriorates. We often suffer from stiff backs and wrinkles. Our internal organs also undergo many changes. Over time, damage can occur due to the toxins that have build up in our organs. Fat can build up over time and put stress on our heart, causing a heart attack or stroke. Our pancreas can also stop working properly, due to too much insulin in the system, thus creating diabetes. Many other diseases can also be found within the various organs of our body. Proper diet as well as implementing the teachings and exercises that make up the yoga principles can retrain our internal organs to support our physical self..
When we work from our larger, peripheral set of muscles, we can actually feel more fatigued and listless than ever. You will start to feel refreshed and revitalized through the practice of Yoga, as this works from deep within the core of the human body. Yoga trains the tranverse abdominus muscles to support the spine and back through the core, instead of relying on the hip flexors and larger rectus abdominal muscles.
You will also start to lengthen your hip flexor muscles so that you can stand taller with less effort. This is done by utilizing the teachings of safe, Yoga exercises. You will notice that you can bend with more ease and comfort. Your breathing muscles will be more open and stronger so that you can breathe in more oxygen.
Yoga will bring the body into a state of balance. This balance of strength and flexibility will ease your movements. Creating ease in the body through the physical postures of yoga will ease the mind. Your muscles will be less strained and stronger at the same time. You will work more efficiently so that there will be less stress on your organs, your heart, and your nervous system. You will feel better from within and eventually you will notice an improvement in the outer you as well.
